THE TRAVELLER’S HANDBOOK
A little knowledge.
A better journey.
Returning from the days of text MUDs, or setting out for the first time? Learn the controls, training and combat here. The secrets are yours to find.
Your first steps
You arrive in Asterfall with a basic class ability, starting equipment, eight loose carrying slots and 1 gold, 50 silver. There is no backpack equipped yet.
Make your character yours.
Choose a class and male or female character, distribute the starting attribute points, and design your profile portrait. That portrait is permanent after creation.
Talk before you travel.
Sage Elowen introduces the town and the Veilbinder. An orange glowing star marks a conversation or available quest; a blue glowing question mark marks a quest ready to turn in.
Buy a thread home.
Edrin the Veilbinder’s small traveller pack costs 1 gold. It provides 16 total slots, replaces your eight loose slots, and includes its binding. You own one backpack; Edrin expands it through quests.
Start close to safety.
Learn the nearby meadows before pushing into distant wilderness. Listen to warnings, carry recovery supplies and leave room for the things you find.
Combat & prepared magic
Outside safe towns, ordinary actions follow a two-second rhythm. Within guarded towns you can walk freely and tend your companions. Harmful spells and attacks are forbidden; marked guild practice and sparring grounds keep their own rules. Movement is deliberate: select a destination, confirm it, then recover before the next action. Watch an enemy’s windup and move away from a threatened square.
Right-click the warmed-spell slot to dismiss prepared magic without casting. Preparation costs are not refunded.
Physical techniques use endurance; magic uses mana. Mana recovers out of combat after a short casting recovery delay. Wizards, Thaumaturges and Clerics automatically meditate as they replenish it. A practiced mind recovers more quickly; the Skills tab shows your current rate. Leave time to recover between encounters. Summoned companions have Follow, Stay and Attack controls above the Journey Log: select an enemy, then choose Attack. Click the Companion label to inspect your pet. Companions try to leave room around fallen loot. Ordinary walking on prepared ground does not drain endurance, but heavy loads, harsh terrain and swimming can wear you out.
The Martial Artist’s leap
While unarmed, a Martial Artist can double-click an enemy up to three squares away to attempt a jump kick, landing on a clear square beside the target. The leap spends an attack and endurance. Hand-to-Hand practice improves control; an awkward landing or sprained ankle delays recovery.
Each calling’s magic has its own character: a Wizard commands destructive elements, while a Thaumaturge weakens enemies with afflictions and fights alongside summoned companions. Read the class abilities for individual spells and techniques.
Power you choose to carry
Your main bar has five shortcuts. Wizards, Thaumaturges and Clerics can fill all five with spells. Knights, Rogues and Martial Artists choose four abilities, with the fifth reserved for a ranged weapon. Open Skills for those three classes or Book for the full casters. Pick an ability icon, then place it in a numbered slot at the bottom of the window. The main bar updates with it.
Techniques act without warming: double-click the shortcut, then choose a target when one is needed. Martial Artists and Rogues also have stances, shown separately from techniques. Only one stance can be active; assigning one to the bar uses an ability slot. Knights find both techniques and spells in their Skills window.
A warmed spell appears as an icon in a glowing blue frame. Holding it costs one mana each recovery tick until you cast or cancel it. Right-click the prepared icon to release your concentration.
Aether Orbs
Every class can equip one Aether Orb. Warm it with its own shortcut, then release it on yourself or a suitable target. Orbs cost no mana to hold, but an ordinary attack breaks concentration. Preparing an orb replaces a prepared spell, and preparing a spell replaces the orb.
The Wayfarer Orb doubles walking speed for twenty seconds; a combat action ends the effect. It recovers over fifteen minutes. Lanternwake offers a minute of travelling light and recovers in ten minutes. Offensive orbs such as Stormspark and Thornheart are consumed when released. Mercy, Vigor and Respite return to strength after ten minutes. The red fill on a recovering orb drains as it becomes ready. You may swap orbs, but swapping does not reset their recovery, and every spare takes pack space.
Choosing an orb for the road
Wayfarer’s Echo briefly marks nearby creatures on the small map without revealing unexplored ground. Stillwater cleanses poison. The Orb of Asterfall offers a journey home, but you must remain still and unharmed for four seconds outside combat; movement, injury or combat interrupts it. Its hour of recovery begins after you arrive.
Mercy restores health, Vigor restores endurance, and Respite restores a little of both. These can aid yourself or a nearby companion and recover over ten minutes. Wizards, Thaumaturges and Clerics can also use the Orb of the Black Lotus to replenish mana. Inspect an orb’s description for its strength, reach and recovery time before you equip it.
A weapon for the distance
Knights, Rogues and Martial Artists have a Ranged slot opposite their pack, with Ammo directly below it. Double-click the ranged shortcut to aim, then click an enemy to attack. Aiming is free; the attack uses your action and endurance. Bows need equipped arrows. A valid shot spends an arrow even when it misses. Ordinary throwing weapons are spent in the same way; returning weapons come back to you.
Supply merchants sell bows and arrows, and distant suppliers carry stronger ammunition. Rogues and Martial Artists can buy inexpensive practice projectiles from their own trainers. Skilled adventurers can seek quests for an obsidian returning hammer or axe for Knights, a silver returning dagger for Rogues, or a silver returning star for Martial Artists.
A caster’s focus
Wizards carry spellbooks, Thaumaturges carry hex dolls, and Clerics carry ankhs in their Focus slot. Early focuses provide a modest five-percent bonus to their school; rarer examples offer ten or fifteen percent. Wizard books strengthen arcane attacks, dolls empower the Thaumaturge’s afflictions and draining magic, and ankhs improve healing.
Learning an ability
Your first basic class ability is known at creation. Reaching a new highest level grants one training point and three attribute points. Each class has its own ability repertoire; a level requirement alone does not mean you have learned the ability.
Trainer lessons
Visit a suitable trainer for your class. A lesson costs one training point and a fee suited to the lesson. Be beside the trainer and ready for an action.
Asterfall teaches the early lessons, with beginner fees from 20 silver to 1 gold. Advanced trainers in Thornwatch ask more for their hard-won knowledge: 10 gold 75 silver for a level-10 lesson, 38 gold for level 15, and 82 gold 75 silver for level 20. The lesson’s required level determines its price, even if you return to learn it later.
Discovered knowledge
Some abilities are learned from scrolls or manuals you discover. You must meet the class and level requirement. Successful study consumes the item, but does not spend a training point.
The class pages identify discovery abilities. Their sources are intentionally left for you to uncover.
Plan a trainer lesson
Estimate the price of an eligible trainer-taught ability.
An estimate, not a list of purchasable abilities. Discovery abilities cannot be bought from a trainer.
Practice & coaching
Character level, learned abilities and practiced skill ranks are different systems. Casting, weapon disciplines, Defense and Shields improve as you use them. There are twenty named ranks, from 0 to 19. Skill advancement is independent of character level, and each successive rank requires roughly 45% more practice.
Practice steadily improves your proficiency. Grow stronger by using your chosen disciplines in battle, then return to a trainer when you are ready for more guidance.
A quiet mind after battle
Wizards, Thaumaturges and Clerics learn Meditation slowly while recovering mana after real battles. It begins automatically once combat and casting recovery allow it. Ranks 3, 8, 13 and 19 add one, two, three and four mana to each two-second recovery pulse. Full mastery is earned through sustained practice, whatever your character level. Meditation is learned through experience rather than paid coaching.
An enchanted Adamantium Yttril Necklace adds another point of recovery while worn. With full Meditation and the necklace, the ordinary one-point pulse becomes six. Scholars and craftspeople have their own stories about the two metals; follow their conversations to begin that journey.
What paid coaching does
A first coaching lesson costs 50 silver. Fees follow your proficiency, independently of character level, and rise more steeply beyond the early ranks. An accomplished practitioner pays far more for a master’s attention than a beginner. A lesson gives 20% extra practice credit for a block of uses that grows with your current rank. Advanced lessons last longer, so guidance remains useful as mastery becomes harder. The lesson screen shows your progress and marks an active lesson In Training. The benefit waits for you to practice; it does not run out while you are away.
Teachers have specialties, and classes have different coaching ceilings. Natural practice can continue beyond a coaching ceiling up to rank 19. Coaching does not buy instant ranks or a permanent experience bonus.
Practice at the guilds
The Knights’ Guild has practice dummies for only the earliest weapon practice. The Rogues’ Guild has a lockbox for the earliest lockpicking practice, with purchased picks and a risk of breakage. Both give diminishing practice near the limit, with no experience, coins or treasure. Real adventures are needed beyond these beginnings.
Equipment & your pack
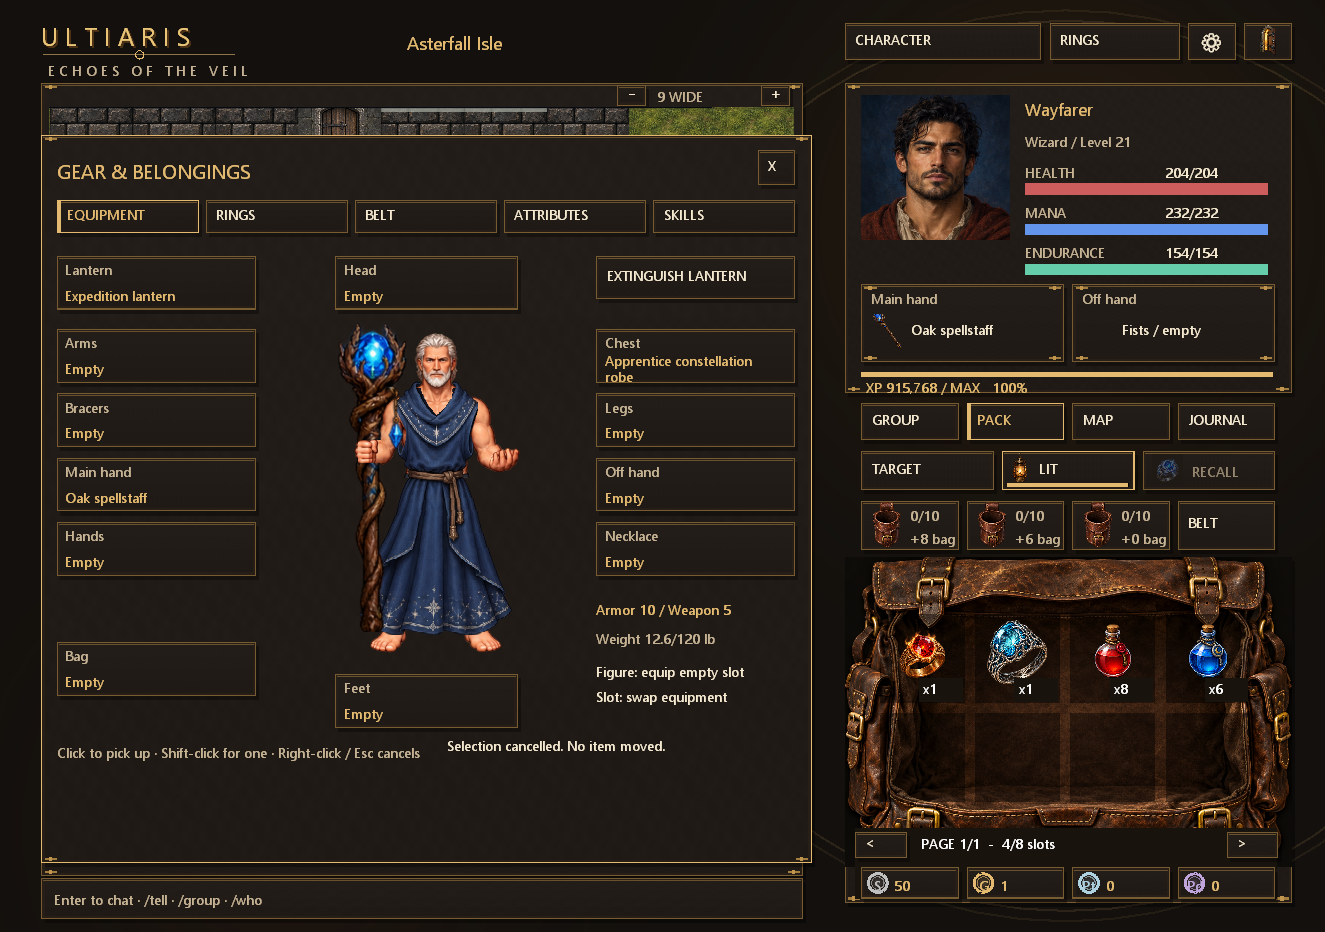
Stats are part of the adventure. Compare armor, weapon power, attribute bonuses, resistances, requirements and weight before changing equipment. Hovering an item reveals its details and an appropriate comparison.
Your purse sits beneath the pack, with Palladium, Platinum, Gold and Silver shown from highest value to lowest. Pick up a denomination to choose an amount; right-click to cancel. Place held coins on another adventurer to trade, or on your current ground square to drop them. Larger denominations make change when needed. To keep money safe, visit a banker.
The sidebar has Group, Pack, Journal and Map controls, with Target, Lantern and Recall below them. Recall opens a dedicated sidebar panel; without a ring, its empty setting is dark and its actions are disabled. Open Character to manage equipment and skills. Your paper doll reflects worn equipment. The profile portrait is separate: click it to open the gear screen. Click any carried item to pick it up on your cursor, then click a highlighted slot to place it. Equipment, rings and belts share this interaction while the pack stays visible. Drop an item onto the paper doll to equip it in an empty matching slot. If the slot is occupied, the item stays on your cursor; click the specific slot to swap instead.
Necklaces occupy their own equipment slot without changing your paper doll. Lanterns also have a dedicated slot, freeing pack space; use the lantern button beneath your portrait or the light/extinguish control on the equipment screen. Store spare belongings in the town Vault. Magical rings, resistance gear and specialized weapons are found through exploration and quests; ordinary merchants stock basic equipment. Restorative balm costs 50 silver and mana tonic costs 60 silver.
Press L to collect belongings at your feet. If none are there, it shows reachable loot on neighboring squares. You can also right-click a specific nearby corpse or pile, including belongings beside a monument. Walls, closed doors and locked chests still block access. Monster remains last ten minutes, deliberately dropped items one hour, and fallen adventurers’ belongings one day. Time continues to pass while you are away. Recover what matters before it is lost.
You have eight slots without a backpack. Buy your only backpack from Edrin for 1 gold to get 16 slots. Help Edrin on your travels to earn a roomier pack. His work expands it to 24, 32 and 40 slots, with a final 48-slot pack reserved for an extraordinary journey. Upgrades preserve your contents and binding.
Three belt pockets hold restorative balm, mana tonic and endurance draught. Shift-click selects one item from a stack; the quantity controls or mouse wheel adjust how many you move. Right-click or Escape cancels the selection. You can place held potions directly into the three small belt pockets above your pack. Pick up an item and click the world to drop the selected quantity at your feet. A confirmation protects ordinary drops. The separate Destroy control in your equipment window permanently removes a selected item. Settings has independent Fast Drop and Fast Destroy options to skip their respective confirmations; both start off. Audio, keyboard, display and item-handling preferences are saved on your computer between sessions and updates. Packing and equipping are handled outside combat. Recall rings keep their special rule: recalling destroys the bound ring.
Death & the Veil
When you fall, your soul lingers beside your body for ten minutes. You can watch the world around you and send tells or speak with your fellowship, but cannot fight, move or handle belongings. Your equipment stays with you while you wait.
A Cleric who has learned Resurrect can select your friendly spirit and call you back on the spot. The advanced Cleric guild teaches this spell from level 11. Sacred resurrection preserves your experience and belongings, but you return with only a tenth of your health and no mana or endurance. Your companions should make the ground safe before calling you back.
The rare Dawn’s Reprieve Aether Orb can also return a lingering soul. Anyone may warm it and release it upon a fallen companion. It is consumed only when the resurrection succeeds. Your belongings return with you, but the crossing still claims the usual portion of your experience.
Choose Release Soul to return immediately, or wait until the countdown ends. Releasing costs 5% of your experience and adds a death scar, up to six. Every two scars reduce your primary attribute and Constitution by one. Neither Cleric nor orb resurrection adds a scar. Worn gear, rings and belt supplies are left at the place where you fell. Your carried money stays with you. An equipped, Veilbound backpack protects its contents. Time continues to pass while you are away; leaving the game does not renew the ten-minute window.
Your one backpack stays bound through every upgrade. Equipment worn outside it remains at risk when you release.
A town to call you home
Before setting out, speak with the town’s soulbinder and choose to bind your soul there. When you release after a death, that town becomes your place of return. Without a chosen binding, you return to Asterfall. Ignareth follows the same rule: visiting its outpost alone does not bind you.
Binding changes where you return, not the price of death. Experience loss, death scars and dropped equipment still apply. Your soulbound pack and its contents remain protected, and your carried coins now remain with you as well. A Cleric or resurrection orb can still call a lingering soul back where it fell.
Those who bring belongings home
Each main settlement has a small adventuring company willing to recover what you left behind. Speak to its leader for a quote. They keep an account of your fortune when you fall: recovery costs 15% of the carried and banked coins you had at death. Spending or transferring money afterward does not reduce the bill. It is a costly way to avoid a desperate journey through the place that defeated you.
Creatures may still take dropped items. While a creature still carries any of your belongings, tracking brings the total fee to 20% of that recorded fortune. The full price is shown before you agree. Recovered possessions wait safely with the company until you have room to collect them.
Recovery returns belongings that still exist; it does not conjure replacements for expired remains or reclaim items another adventurer has already collected. It does not restore lost experience or mend death scars. Fallen belongings survive a normal server restart, but decay after one day. Time away does not renew that day.
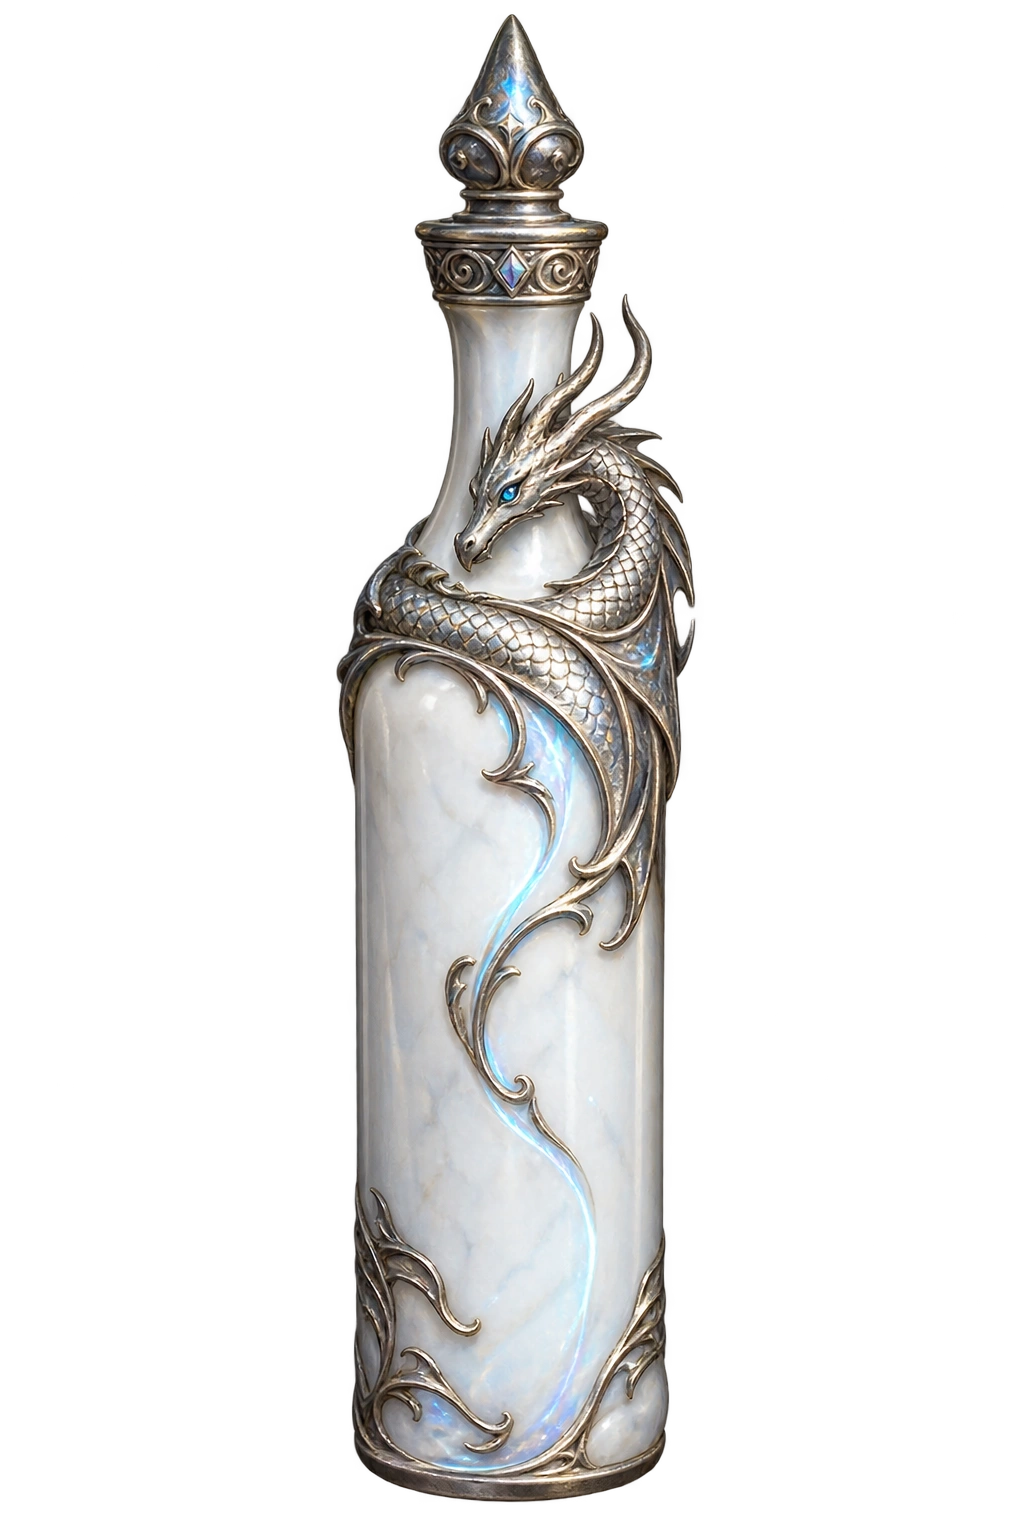
Drake Potion · mend a death scar
What a DP does
- Removes one death scar.
- Does not restore health, mana or endurance, and does not resurrect a fallen adventurer.
- Does not grant a permanent Constitution point or any other permanent attribute increase.
- One bottle is consumed when a scar is removed. With no scars, you keep the potion.
How to drink it
Keep the bottle in your pack. Right-click it to drink, or pick it up and choose Use in the character window. You must be alive and ready to act. It is a special restorative, separate from your belt’s balm, mana tonic and endurance draught.
What scars take—and what mending returns
Every two scars reduce your profession’s primary attribute by one and your Constitution by one. The limit is six scars. Your underlying attribute allocation is preserved; mending removes the penalty rather than granting a new point.
| Death scars | Primary attribute | Constitution |
|---|---|---|
| 0–1 | No penalty | No penalty |
| 2–3 | −1 | −1 |
| 4–5 | −2 | −2 |
| 6 | −3 | −3 |
For a Knight, the primary attribute is Strength. For Rogues and Martial Artists it is Dexterity; for Wizards, Intelligence; for Clerics and Thaumaturges, Wisdom.
With two scars, drinking a DP leaves one and restores the lost primary attribute and Constitution. With three scars, one bottle leaves two: the scar is mended, but the attribute penalty remains until another is removed. Attributes never fall below their usual minimum.
Returning without another scar
A Cleric’s resurrection and Dawn’s Reprieve Aether Orb both return a lingering spirit without adding a scar. A Cleric also preserves experience; the resurrection orb still carries the normal experience loss. Releasing your soul, including when the waiting time ends, can add a scar until the six-scar limit is reached.
Why the seventh scar never forms
Each return from death leaves a mark where the soul was torn from the flesh. The first scars are faint, but as they gather, they weaken both the adventurer’s strength of spirit and the body that shelters it.
After the sixth, those marks join into a single, unbroken seam. Death can still claim the adventurer, but the soul now parts along that old wound rather than tearing anew. No further scars form—not because the soul has become invulnerable, but because the wound has become familiar.
The ancient Drake Potion mends a portion of that seam, restoring what ordinary healing cannot reach.
Finding a white bottle
Drake Potions are rare rewards from dangerous journeys. Ordinary creatures of level seven or higher may yield one only very rarely; named foes and bosses are more promising. There is no guarantee that a particular victory will bring one home.
Beyond the familiar roads
Asterfall’s gates open onto more than hunting grounds. Follow a rumour into the reeds, find an old road beneath the trees, or return to a familiar face with a story of your own. The most interesting journeys often begin in conversation.

Where will curiosity take you?
From Asterfall’s shores to Ignareth’s fire and Nocturne’s endless night: discover the places, the legends and the preparations that make a journey possible.
Explore the worldRead the land as you go
Open Map for your surroundings or press M to consult the atlas. Asterfall’s town map marks its services; the wider atlas remembers the overland ground you have discovered. Underground maps reveal the passages you have seen and are available while you are inside that dungeon.
Listen, then look again
Your Journal keeps your current quests and completed stories. Read markers, speak with the people you meet, and return after an adventure: what you have learned may give someone a new reason to trust you.
Carry a light and a way home
Caves hide their turns beyond the lantern’s reach. Take oil, restorative supplies and a bound recall ring before a long expedition. Farther lands demand stronger preparation and companions you trust. Learn how to tend your lantern and use your travel tools.
Rings, lanterns & locks
Tend your travelling light
A new lantern begins full. A starter lamp burns for ten minutes per charge; Warden and Everwatch lanterns stretch that to fifteen and twenty minutes. Used lanterns keep the oil left in their own reservoirs when exchanged or stored. Fuel burns while the lamp is lit and you are online.
Open the lantern panel to light or extinguish it. The oil icon shows how many refills remain in your pack; click it to refill. Refilling is always your choice. Carry spare oil and heed the low-fuel warning—an empty lamp leaves you in the dark. On stepping out of a dark region into daylight, you automatically extinguish the flame.
Nocturne consumes even a strong light: without one, you see only the square beneath you; a lantern reveals two squares around you. Lanternwake’s extraordinary radiance reaches three for one minute, then needs ten minutes to recover.
Seek a blessing before danger
A Cleric can protect you from fire, ice, poison or arcane magic for thirty minutes. Their stronger blessing replaces a lesser ward of the same kind, and a weaker ward cannot displace it. A Wizard’s Frostfire Mantle protects against fire and ice for fifteen minutes; a Thaumaturge’s Venom Veil protects against poison. Clerics can also strengthen your maximum health with Blessing of Vitality. Renewing a blessing does not stack its strength.
Your ten ring slots let you combine protection and useful attributes. Duplicate bonuses stack up to their limits: +6 per attribute across worn gear, 8% physical blocking, 80% elemental resistance, +4 armor from rings, and +6 raw spell power from rings. Additional copies beyond a limit give no further benefit; mix your rings for the journey ahead. Enduring Breath needs only one source.
Recall opens beside the world, showing your ring’s animated glow and bound destination. Recall returns you immediately and consumes the ring, without another confirmation. The smaller Unbind & Remove control safely returns the intact ring to your pack without travelling; leave combat and make room first.
Rogues excel at lockpicking. Their guild offers thorough instruction, discounted picks and a practice lockbox for the first few ranks. Other classes can learn, but receive only basic coaching and improve through practice at half the Rogue’s rate. Supply merchants sell picks to all adventurers. Harder locks demand greater skill and are more likely to break a pick, so bring spares and know when to leave a lock for another day.
A fellowship for the road
Up to four adventurers can travel together. The small Party tab at the upper-left of the world opens downward to show your companions' health and strength. Open Group on the right to find Chat, Loot and Loot Rules.
Sharing a discovery
When treasure needs your choice, a red, pulsing LOOT alert appears beside the Party tab. Click it to see the item, hover its picture for details, and choose Need if you can equip it, Greed for another use, or Pass to leave it to your companions. Need takes precedence over Greed; tied choices are settled at random. You have 45 seconds. Everyone in the fellowship can inspect the find, but only those nearby when it dropped may claim a share.
The leader chooses Need Before Greed, taking turns, or free-for-all, and whether coins are shared equally or kept by whoever collects them. Need Before Greed applies to rare gear; other items take turns. Changes affect future finds. Existing rolls stay in place. Awards appear in the Journey Log. When only one adventurer remains, the fellowship disbands automatically.
Light shared, names remembered
Stay near a companion's lit lantern to see the ground their flame illuminates. Stone and closed doors still block the light, and Nocturne keeps its deeper darkness. Choose a one-word first name and, if you wish, a surname. Friends and private messages use your first name: /tell Bodach, for example.
Press Enter to speak nearby, or / to start a command. Use /tell Name message for a private conversation, /group message for your party, and /emote to describe an action. /who lists adventurers in your area; /who all shows those visible across the world. Game Masters are marked [GM]. New tells highlight the Tells strip red. Click it to read and reply; several conversations open a scrollable list. The small × dismisses a notice, while the permanent envelope reopens your conversations. Private history lasts for your current login session. GROUP glows blue when party messages are waiting. To report a problem, type /bug followed by what happened; your location is included automatically.
Craftspeople of the regions
Mira outfits new adventurers in Asterfall. Thornwatch carries field weapons and shields, while Emberwatch and Lanternwake stock more specialized arrows. Small outposts keep travel supplies close at hand. Shops initially show equipment suited to your class; switch to All Classes when shopping for a companion. Edrin can lighten the stitching of your existing backpack after you have earned its capacity. Your belongings and binding remain safe, and the light stitching carries forward through later pack upgrades.
Start with basic hides in Asterfall. Thornwatch’s tanner also works orc leather; Emberwatch’s specialist handles frost hides, rime drakes and ice dragons; Lanternwake’s tanner handles cinder dragon hides. Bring the required hides and crafting fee to the appropriate specialist.
Banking & your personal Vault
The banker’s window has two separate sides: Carried Money and Bank Balance. Click a coin denomination on either side, type how many you want in the small window, then choose Pick Up. Place the coins on the opposite side to deposit or withdraw. Shift-click picks up the whole stack immediately. Right-click or Escape cancels. Money moves only when you complete the transfer. Your recent transactions and the confirmation below them help you check the result. The nearby wall vault holds your personal belongings, with your pack and stored items shown separately.
Trading with another adventurer
Outside combat, stand within two squares of another player. Pick up an item from your pack and click their character to open a trade. The two offers appear side by side, with your pack still available. Pick up more items and click your offer to add them; the mouse wheel adjusts stack quantities. Click one of your offered items to pick it back up and remove it from the deal. Hover over an item icon for its usual details. Equipped items must be moved to your pack first; backpacks stay with their owners.
Choose coins from the purse below your pack and drop them onto another player to start a trade, or anywhere in the open trade window to add them to your own offer. Each side has a labeled coin total; click your offered coins to pick them back up. Both players must accept the same offer. Any change clears both acceptances. The exchange completes only when both offers are accepted and both adventurers have enough room. If another window is open, a named trade notice lets you open or cancel the pending trade without interrupting that window. Closing the trade window keeps the offer pending; Cancel, walking away or disconnecting ends it with your belongings still yours.
Keep your companions close
Type /friend to open your private friends list, add or remove names, and see who is online. Choose Tell beside an online companion to prepare a private message. The list also has a Tell Herald button. Press R while not typing to reply to the last person who sent you a tell.
Right-click a spell or technique in your book to read its description, level and cost.
Help on the road
Game Masters are identified by a [GM] tag. Use /bug to report something that is not working, or contact us through the website for account help. Describe what happened and where you were; never share your password.
Your Journey Log
The Journey Log follows your travels, conversations and discoveries. Click it to expand your current session’s history. Item links let you inspect things that companions find, and player lists appear in blue so they are easy to spot.
The essentials at hand
| Input | Action |
|---|---|
| Click ground | Preview movement |
| Double-click the same square | Confirm movement |
| Click a person or creature | Inspect the selected target |
| Double-click an enemy | Attack with your main-hand weapon |
| 1–5 | Use assigned abilities; slot 5 aims a ranged weapon for Knights, Rogues and Martial Artists |
| E | Use a nearby service or passage |
| L | Loot at your feet, or nearby when nothing is underfoot |
| C / portrait | Open character equipment |
| J | Open the quest journal |
| M | Open the atlas |
| Q / T / Y | Use balm / tonic / draught |
| Click an inventory item | Pick up; click a valid destination to place |
| Shift-click / mouse wheel | Select one / adjust stack quantity |
| Right-click / Escape while carrying | Cancel the item selection |
| Escape | Close a window or clear targeting |
| Right-click reachable ground | Open the loot on that square |
| Right-click a pack item | Use, read or equip the item |
| Shift + right click a pack item | Request a one-item drop |
| Held item + click the world | Drop the selected quantity at your feet |
| Right-click warmed spell | Cancel prepared magic |
| Companion label | Select your summoned pet |
| Enter | Type and send chat |
| / | Focus chat with a command slash |
| Held pack item + click another player | Open a trade within two squares |
| /tell Name message | Send a private message |
| /group message | Speak to your party |
| /emote action | Describe your character’s action in yellow |
| /who / /who all | See players on your map / online |
| /bug message | Report a problem with your current location |
Bindings can be adjusted in Settings. The controls shown here are the defaults.
Keep what matters
Merchants ask for confirmation before buying a rare item or Aether Orb. Use Lock beside an item in the selling list to prevent its sale; use Unlock when you are ready to part with it. For identical items shown together, the lock protects the entire row, including copies you acquire later. The preference is saved for your character. Locked belongings can still be used, equipped, stored or traded; this lock protects against merchant sales.
Ten kinds of gemstones reward an observant adventurer. From Cloudy agate to the precious Blue Diamond, their value varies greatly. A Blue Diamond sells for one platinum. Check a merchant’s offer before selling.
Keep the journey yours
You may abandon an active quest from the journal and accept it again later when eligible. Earned progress is remembered, but setting a quest aside neither completes it nor awards its rewards.
Rare treasures ask for confirmation before a merchant buys them. Settings offers Fast Rare Sell if you prefer to skip that question; explicit sale locks still protect your chosen belongings. Buff-bar symbols now identify the effect itself, regardless of the item granting it.
Give the darkness its due
Without a lit lantern, your sight in ordinary dungeons reaches only two squares. Carry light and mind the walls: a lantern extends your view, but cannot reveal what lies behind stone. Nocturne keeps its deeper darkness.
Cleared passages offer a little breathing room. Ordinary foes across the overworld and dungeons return after five minutes, while the creatures of Ignareth take eight to ten. Nearby adventurers can delay their return. Dungeon foes endure a little more punishment; named guardians keep their own longer watches.
Wards against hostile magic
Armor helps against weapons. A curse calls for a different defense. Fire, ice, poison, disease and curse protections guard against their own kinds of harm; one does not replace the others.
A Spellward ring offers 5% general protection against damaging spells. Equipped Spell Ward sources share a maximum of 20%. They work alongside the appropriate resistance, reducing what remains after that protection, up to 80% total spell reduction. They do not blunt ordinary weapon strikes or environmental hazards.
Your Attributes page shows Spell Ward and your individual resistances. Mira in Asterfall and Thornwatch suppliers stock Spellward rings and curse-protection jewelry. Check an item's requirements before buying.